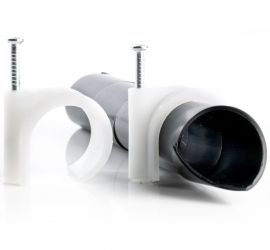
Cable clips with nail
Cable clips with nail are fastening components used to quickly and neatly secure cables and conduits along walls, ceilings, or floors. Each clip consists of a plastic holder with an integrated metal nail. This makes installation a single action in most cases: position the clip and drive it in. Cable clips with nail are widely used in installation and renovation work because they help route cables cleanly and reduce the risk of loose or hanging wiring.
What are cable clips with nail?
A cable clip with nail is designed to fix a cable or conduit to a surface. The plastic clip clamps around the cable and holds it in place, while the nail anchors it to the surface. Cable clips with nail are chosen when speed, simplicity, and a neat finish are important—for example, when concealing installation wires along skirting boards or guiding cables toward a connection point.
In practice, this type of fastening works especially well for straight runs and repetitive installation work. The clips are available in various diameters, allowing you to match the size to the cable thickness and the required clearance around the cable.
Materials and components
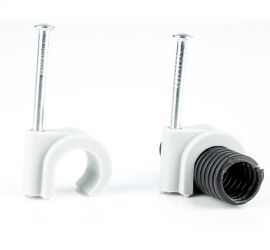
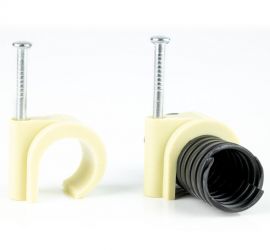
Cable clips with nail consist of two main parts: the clip and the nail. In our range, the clips are made of nylon and the nail is made of metal. Nylon is often chosen because it is slightly flexible and can clamp the cable securely without breaking during installation or with minor movement.
The nail is integrated into the clip. This makes installation fast, but also means the fixing needs to be positioned correctly in one go. During preparation, it is therefore useful to mark out the cable route in advance, especially when multiple clips need to be installed in a straight line.
Sizes and diameters
The size of a cable clip with nail is determined by the cable diameter it must accommodate. Because the plastic clip can flex slightly, sizes are usually specified as a range rather than a single fixed dimension. This allows for small differences in cable thickness and helps ensure a secure grip.
Available clip size ranges in our assortment include:
- 5 to 7 millimeters
- 8 to 10 millimeters
- 11 to 15 millimeters
- 16 to 19 millimeters
- 23 to 29 millimeters
When choosing the correct size, it is advisable not to select a clip that is too tight. A clip that is too small can put stress on the cable. A clip that is too large will hold the cable less firmly, making the run look less tidy.
Colors and variants
Cable clips with nail are available in white, gray, and cream. Color availability may vary by size. The color choice is usually practical: you match the clip to the surface or the cable so the fixing is less noticeable or, alternatively, remains clearly visible within an installation.
In installations where multiple cable routes run alongside each other, color can also help distinguish between routes or maintain a uniform appearance in visible installations, such as along walls and ceilings.
Applications in installation and construction
Cable clips with nail are widely used in electrical installations and in construction and renovation work to securely fasten cables and conduits. Typical applications include routing cables along walls, skirting boards, and ceilings in both residential and commercial buildings. Cable clips with nail are also used when installing lighting, data cabling, or general wiring, allowing work to be carried out quickly and neatly.
Cable clips with nail are mainly used when:
- a cable needs to be visible and neatly finished
- many fixing points are required in a short time
- installation without adhesives, wall plugs, or screws is preferred
Whether cable clips with nail are suitable for a specific location depends on the substrate and the conditions. In some situations, an alternative fastening method may be more practical, for example when the surface is not suitable for nailing.
Installation and use
Installing cable clips with nail is straightforward: position the cable, place the clip, and drive in the nail. For a neat result, a consistent working method is recommended—such as aligning the cable run straight and keeping equal spacing between clips. This helps prevent cables from wavering or tension building up at bends.
Practical installation tips:
- Choose a clip size that matches the cable diameter and provides sufficient clamping force
- Use a controlled hammer strike and ensure the clip does not pull the cable at an angle
- Install additional clips at bends, connection points, and transitions to limit movement
For outdoor installation or variable conditions, it is important that the cable itself is suitable for the environment. In such cases, the clip mainly serves as mechanical fastening and guidance.
Advantages of cable clips with nail
Cable clips with nail are often chosen for their speed and ease of installation. No separate screw or wall plug is required, making installation work more efficient. In addition, the clip contributes to neat cable routing and helps keep cables in place, reducing the risk of loosening or damage.
Key practical advantages:
- Fast installation in a single action
- Neat routing along walls, ceilings, and skirting boards
- Improved order and safety in cable routes
- Multiple sizes and colors for adaptation to different situations
Accessories and alternatives
Not every situation calls for cable clips with nail. Depending on the substrate and installation method, alternatives may be more suitable. Examples include adhesive mounting bases combined with cable ties, or other clip systems such as mounting brackets. In some projects, it may also be more practical to route cables inside conduits, ducts, or other cable management systems—especially when protection or shielding is more important than fast installation.